Today we're going to build a beginner shopping app with react-native navigation. we'll understand the basics of react-native Navigation, how things work behind the scene and how it is different from browser navigation. So let's get started
Need of React Native Navigation
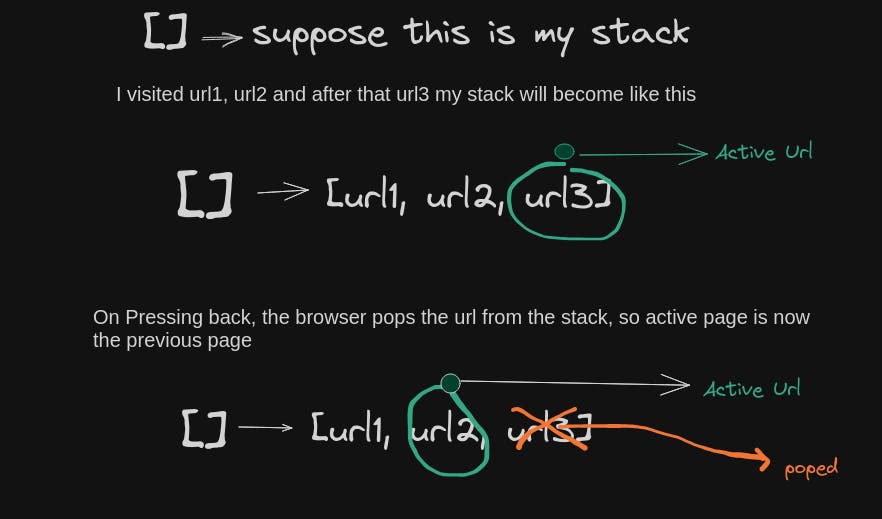
In a web browser, you can link to different pages using an anchor <a> tag. When the user clicks on a link, the URL is pushed to the browser stack(think of an array). When the user presses the back button, the browser pops the item from the array, so the active page is now the previously visited page.

But React Native doesn't have a built-in idea of a global history stack like a web browser does -- this is where React Navigation enters the story.
React Navigation provides a way to create and manage the navigation flow within a React Native app. It allows you to define screens and navigate between them seamlessly.
To use React Navigation, you typically start by creating a navigation container, which acts as a wrapper around your app's content. Inside the navigation container, you define a set of screens that represent different parts of your app.
Each screen is a component that represents a distinct view or page. You can navigate between screens using different navigation actions such as pushing a new screen onto the stack, popping a screen off the stack to go back, or switching between tabs.
React Navigation offers different navigators that determine the navigation behaviour. Some common navigators include Stack Navigator, Tab Navigator, Drawer Navigator, and Switch Navigator. You can choose the navigator that suits your app's navigation requirements. For this tutorial, we're using Stack Navigator
You can also pass parameters or data to screens during navigation and receive them in the screen components. This allows you to customize the content or behaviour of the screens based on the data passed.
Let's start building the App
I hope you have your environment ready now open your IDE (In case you don't know what an IDE is it's a software application that helps programmers to develop software code efficiently ) For this tutorial we're using Visual Studio Code.
open the VScode terminal and paste this command
npx react-native@latest init shopping
This will create your native folder named shopping. Now in the terminal type
cd shopping
you are in the main directory and now search for a file App.tsx This will be our main file where we'll write all logic. Let's start our app by connecting your phone via cable (In the developer option in the mobile setting make sure Install via USB,USB debugging and USB debugging(security settings) is enable)
run the following command
npx react-native start
This will start your shopping app on mobile.
Installing React-Native Navigation
In the terminal, Install the required packages in your React Native project:
npm install @react-navigation/native
npm install react-native-screens react-native-safe-area-context
The libraries we’ve installed till now are the building blocks and shared foundations for navigators. RN Navigation provides different ways to navigate between pages through Navigators such as Stack Navigator, Tabs Navigator, Drawer Navigator and more for this tutorial, we're using Stack Navigator.
npm install @react-navigation/stack
Structuring Our App
We can write our all logic and components, screens(the component that represents a specific user interface ex: home, about and blog sections) inside App.tsx but that will be a bad practice. We'll define different folders for each use case so that our app will be easy to customise anything in future and most important we'll not get stuck in scrolling hell.
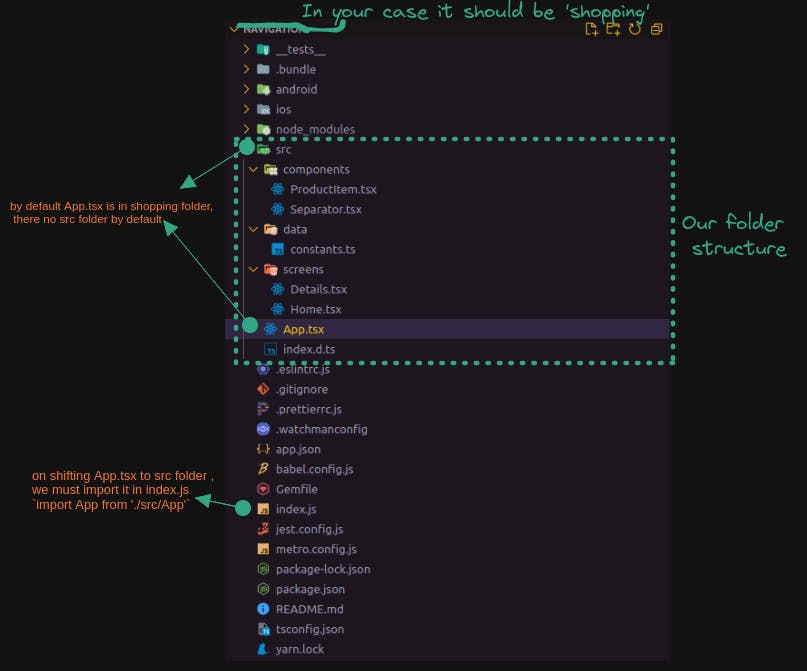
In the shopping folder, create another folder src and move the App.tsx file to it, it'll get imported automatically in index.js if not you can manually import it.
import App from './src/App';
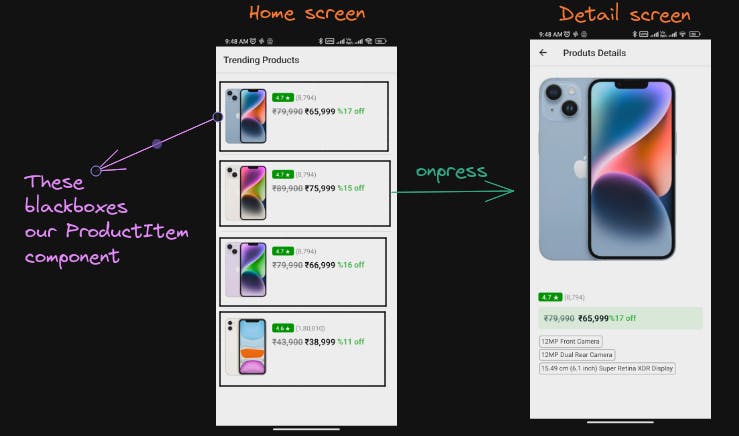
Now, let me give you a preview of this shopping app so that you can understand the folder structure more easily

Here, we'll need an array of products and to display them we need components(a "component" is a reusable building block that encapsulates logic and renders a part of the user interface.) In this case, we need ProductItem and Separator. After creating the component we need screens for our Home page and Detail page. Don't worry if you didn't get it I'll explain them in detail when we work on them.
In src folder, create 3 folders components, data and screens folder inside components create 2 file Productitem.tsx and Separator.tsx , In data create constants.ts and last in screens create 2 file Details.tsx and Home.tsx .Your folder structure is ready and by now it should look like this.

In App.tsx you can remove all the code which is given by default, and we'll write our own logic.
import React from 'react'
import { StyleSheet, Text, View } from 'react-native'

const App = () => {
  return (
   <Text>Hello World</Text>
  )
}

export default App

const styles = StyleSheet.create({})
Configure RN-Navigation
In App.tsx , import NavigationContainer It will serve as the entry point for navigation in an RN application. It is responsible for managing the navigation tree and providing the navigation functionality to the rest of the application.
// Navigation
import { NavigationContainer } from '@react-navigation/native'
Let's import screen In React Native, a "screen" refers to a component that represents a specific user interface or view within an application. Screens are the building blocks of mobile app interfaces and are responsible for displaying content, handling user interactions, and providing the necessary functionality.
Screens in React Native typically correspond to different sections, features, or views within an application. For example, a social media app may have screens such as a login screen, home screen, profile screen, settings screen, and so on.
//screen
import Home from './screens/Home'
import Details from './screens/Details'
After importing screens in our App.tsx . We need to define their types because we are using Typescript.
type RootStackParamList = { ... }). It cannot be an interface (e.g. interface RootStackParamList { ... }). It also shouldn't extend ParamListBase (e.g. interface RootStackParamList extends ParamListBase { ... }). Doing so will result in incorrect type checking where it allows you to pass incorrect route names.// A "RootStackParamList" is a TypeScript type that defines the available screen names and their respective parameters in a navigation stack.
export type RootStackParamList = {
Home:undefined, //Home does't expect any parameters
Details:{product:Product} //Details expect parameter product
}
In the above code, the Details page is expecting a parameter. when we press on any product in the Home screen it will navigate us to the Detail page of that product so we need to pass the required product to see the detail. Again, we need to define the type of product so let's create one.
In src, create a file index.d.ts we can define the type of Product
interface Product{
    id: string,
    name: string,
    imageUrl: string,
    originalPrice: number,
    discountPrice: number,
    offerPercentage: number,
    rating: number,
    ratingCount: number,
    tags:string[],
}
As I told you above RN Navigation provides different ways to navigate such as Stack Navigator, Tab Navigator, Drawer Navigator, and Switch Navigator. You can choose the navigator that suits your app's navigation requirements. For this tutorial, we're using Stack Navigator . Let's use this
// Navigation
import {createNativeStackNavigator} from '@react-navigation/native-stack'

//Here we are creating our stack navigator in which we're deciding what screen will get what type of data using RootStackParamList
const Stack = createNativeStackNavigator<RootStackParamList>()
It's time to serve entry point for navigation in an RN application.Inside App.tsx in App function paste this code and please read the comments given in the code carefully
const App = () => {
  return (
    // NavigationContainer is a component that serves as the entry point for navigation in a RN application. It is responsible for managing the navigation tree and providing the navigation functionality to the rest of the application.
   <NavigationContainer>
    {/* The navigator packages  export  navigation and route props from the corresponding navigator to each of its children screen*/}
    <Stack.Navigator initialRouteName='Home'>
          <Stack.Screen name="Home" component={Home} options={{title:'Trending Products'}}/>
          <Stack.Screen name="Details" component={Details} options={{title:'Produts Details'}} />
    </Stack.Navigator>
   </NavigationContainer>
  )
}
In ./src/data/constants.ts let's create an array of products.
//The Product before the square brackets ([]) indicates the type of each element in the array.
export const PRODUCTS_LIST: Product[] = [
    {
      id: '1',
      name: 'APPLE iPhone 14 (Blue, 128 GB)',
      imageUrl:
        'https://rukminim1.flixcart.com/image/300/400/xif0q/mobile/3/5/l/-original-imaghx9qmgqsk9s4.jpeg',
      originalPrice: 79990,
      discountPrice: 65999,
      offerPercentage: 17,
      rating: 4.7,
      ratingCount: 8794,
      tags: [
        '12MP Front Camera',
        '12MP Dual Rear Camera',
        '15.49 cm (6.1 inch) Super Retina XDR Display',
      ],
    },
    {
      id: '2',
      name: 'APPLE iPhone 14 (Starlight, 256 GB)',
      imageUrl:
        'https://rukminim1.flixcart.com/image/300/400/xif0q/mobile/m/o/b/-original-imaghx9qkugtbfrn.jpeg',
      originalPrice: 89900,
      discountPrice: 75999,
      offerPercentage: 15,
      rating: 4.7,
      ratingCount: 8794,
      tags: ['12MP Front Camera', '15.49 cm (6.1 inch) Super Retina XDR Display'],
    },
    {
      id: '3',
      name: 'APPLE iPhone 14 (Purple, 128 GB)',
      imageUrl:
        'https://rukminim1.flixcart.com/image/300/400/xif0q/mobile/b/u/f/-original-imaghxa5hvapbfds.jpeg',
      originalPrice: 79990,
      discountPrice: 66999,
      offerPercentage: 16,
      rating: 4.7,
      ratingCount: 8794,
      tags: ['12MP Dual Rear Camera', '15.49 cm Super Retina XDR Display'],
    },
    {
      id: '4',
      name: 'APPLE iPhone 11 (White, 64 GB)',
      imageUrl:
        'https://rukminim1.flixcart.com/image/300/400/k2jbyq80pkrrdj/mobile-refurbished/k/y/d/iphone-11-256-u-mwm82hn-a-apple-0-original-imafkg25mhaztxns.jpeg',
      originalPrice: 43900,
      discountPrice: 38999,
      offerPercentage: 11,
      rating: 4.6,
      ratingCount: 180810,
      tags: [
        '12MP Front Camera',
        '12MP Dual Rear Camera',
        '15.49 cm (6.1 inch) Super Retina XDR Display',
      ],
    },
  ];
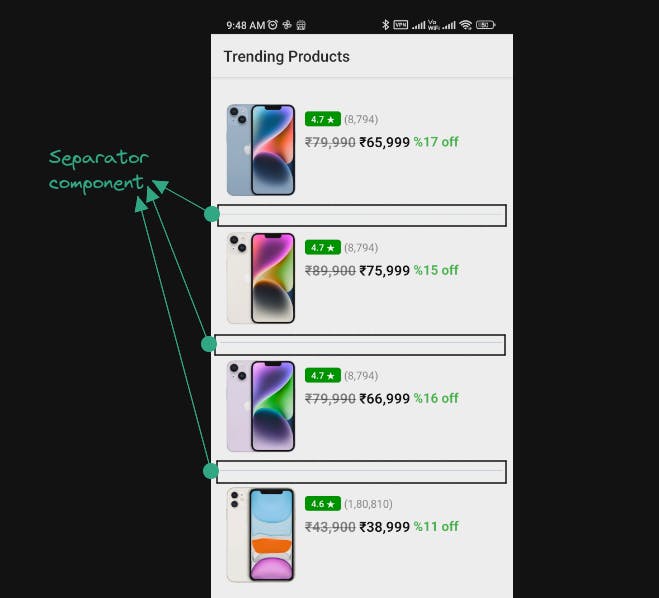
In ./src/components/Separator.tsx, this file will be responsible for creating a separation between each product. we could use CSS border property, but I just wanted to show you how we could use ItemSeparatorComponent props in <FlatList/>

In Separator.tsx , paste this code
import { StyleSheet, Text, View } from 'react-native'
import React from 'react'

const Separator = () => {
  return (
    <View style={styles.seprator}>

    </View>
  )
}

const styles = StyleSheet.create({
    seprator:{
        height:0.8,
        backgroundColor:'#CAD5E2'
    }
})
export default Separator
Okay, let's create our ProductItem component in ./src/components/ProductItem.tsx . In ProductItem.tsx let's define the type of product
import React, { PropsWithChildren } from 'react'

type ProductItemProps = PropsWithChildren<{
    product: Product,
}>
PropsWithChildren stops you from passing anything which looks like a string but actually a particular data type that is being passed, you can always avoid this but in case you want a 100% surety that whatever the data you are passing in this component should be of some particular type.
Example:
// we are restricting the type of  imageUrl just in case  the provided url is image url not some text,html based url
type imageUrlProps = PropsWithChildren<{
  imageUrl : ImageSourcePropType
}>
Let's finish ProductItem.tsx ,
./src/component/ProductItem.tsx
import { Image, StyleSheet, Text, View } from 'react-native'
import React, { PropsWithChildren } from 'react'

//PropsWithChildren- actually stops you from passing anything which looks like a string but actually a particular data type that is being passed you can always avoid this but in case you want a hundred percent surety that whatever the data you are passing in this component that should be of some particular type
type ProductItemProps = PropsWithChildren<{
    product: Product,
}>

//we need product  but we cannot use them directly with type any so we need to define there type(as you can see above -->type ProductItemProps)
const ProductItem = ({product}:ProductItemProps) => {
  return (
    <View style={styles.container}>
      <Image
      source={{uri: product.imageUrl}}
      style={styles.image}
      />

      <View>
        <Text style={styles.name}>{product.name}</Text>

        <View style={[styles.rowContainer, styles.ratingContainer]}>
            <View style={styles.rating}>
                <Text style={styles.ratingText}>{product.rating} ★</Text>
            </View>
            <Text style={styles.ratingCount}>

    {/*The toLocaleString method is a built-in JavaScript function that is available on number, date, and array objects. It is used to convert  a value to a localized string representation based on the specified locale and formatting options.
      const number = 12345.6789;
      console.log(number.toLocaleString()); // Prints "12,345.679" (using default locale) */}
                ({product.ratingCount.toLocaleString()})
            </Text>
            </View>

            <View style={[styles.rowContainer, styles.priceContainer]}>
                <Text style={styles.originalPrice}>
                    ₹{product.originalPrice.toLocaleString()}
                </Text>
                <Text style={styles.discountPrice}>
                    ₹{product.discountPrice.toLocaleString()}
                </Text>
                <Text style={styles.offerPercentage}>
                    %{product.offerPercentage} off
                </Text>
        </View>
      </View>

    </View>
  )
}

export default ProductItem

const styles = StyleSheet.create({
    container: {
      margin: 8,
      flexDirection: 'row',
    },
    rowContainer: {
      flexDirection: 'row',
    },
    image: {
      width: 90,
      height: 150,
      resizeMode: 'contain',

      marginRight: 12,
    },
    name: {
      marginBottom: 4,

      fontSize: 15,
      fontWeight: '500',
    },
    ratingContainer: {
      marginBottom: 8,
    },
    priceContainer: {
      marginBottom: 12,
    },
    rating: {
      borderRadius: 4,
      paddingHorizontal: 8,
      justifyContent: 'center',
      backgroundColor: '#008c00',

      marginRight: 4,
    },
    ratingText: {
      color: '#fff',
      fontSize: 12,
      fontWeight: '600',
    },
    ratingCount: {
      color: '#878787',
    },
    originalPrice: {
      fontSize: 18,
      marginRight: 4,
      fontWeight: '600',

      color: 'rgba(0, 0, 0, 0.5)',
      textDecorationLine: 'line-through',
    },
    discountPrice: {
      fontSize: 18,
      marginRight: 4,
      fontWeight: '600',

      color: '#000000',
    },
    offerPercentage: {
      fontSize: 17,
      fontWeight: '600',
      color: '#4bb550',
    },
  });
It's time to create our screen to show products.In order to get products will will import our product array
On clicking on the product it will navigate us to the Detail page so we need to send Product to Detail as a prop to do this we will use NativeStackScreenProps
So Inside ./src/screens/Home.tsx
import { FlatList, Pressable, StyleSheet, Text, View } from 'react-native'
import React from 'react'

// we need to import NativeStackScreenProps because we need to extract some props as well and we need to send some prop inthe navigation as well
import { NativeStackScreenProps } from '@react-navigation/native-stack'
import { RootStackParamList } from '../App'

//importing Components
import ProductItem from '../components/ProductItem'
import Separator from '../components/Separator'

//Data
import { PRODUCTS_LIST } from '../data/constants'

//Again, In order to use props in Home we need to define its type else it will throw an error of type:ANY .but for now we;re not using any props in Home its just for future proof
type HomeProps = NativeStackScreenProps<RootStackParamList,'Home'>

const Home = ({navigation}:HomeProps) => {
  return (
    <View style={styles.container}>
      <FlatList data={PRODUCTS_LIST} keyExtractor={item=> item.id} ItemSeparatorComponent={Separator} renderItem={({item})=>(
        <Pressable onPress={()=>{
          navigation.navigate('Details', {product:item})
        }}><ProductItem product={item}/></Pressable>
      )}/>
    </View>
  )
}

export default Home

const styles = StyleSheet.create({
  container: {
    flex: 1,
    alignItems: 'flex-start',
    justifyContent: 'center',

    padding: 12,
    backgroundColor: '#FFFFFF',
  },
});
This will be our last part so let's finish this
So Inside ./src/screens/Details.tsx paste this code
import { ScrollView, StyleSheet, Text, View, Image } from 'react-native'
import React from 'react'

// react navigation
import {NativeStackScreenProps} from "@react-navigation/native-stack"
import { RootStackParamList } from '../App'

type DetailsProps = NativeStackScreenProps<RootStackParamList, "Details">

//we are able to destructure route because of  of stack.Navigator provided in App.tsx
const Details = ({route}: DetailsProps) => {
  const {product} = route.params
  return (
    <ScrollView style={styles.container}>
      <View>
       <Image style={styles.image} source={{uri: product.imageUrl}} />
       <View>
        <Text style={styles.name}>{product.name}</Text>

        <View style={[styles.rowContainer, styles.ratingContainer]}>
            <View style={styles.rating}>
                <Text style={styles.ratingText}>{product.rating} ★</Text>
            </View>
            <Text style={styles.ratingCount}>
                ({product.ratingCount.toLocaleString()})
            </Text>
            </View>

            <View style={[styles.rowContainer, styles.priceContainer]}>
                <Text style={styles.originalPrice}>
                    ₹{product.originalPrice.toLocaleString()}
                </Text>
                <Text style={styles.discountPrice}>
                    ₹{product.discountPrice.toLocaleString()}
                </Text>
                <Text style={styles.offerPercentage}>
                    %{product.offerPercentage} off
                </Text>
        </View>
        {product.tags.map((tag, index) => (
          <View key={index} style={styles.badge}>
            <Text style={styles.tagBadge}>{tag}</Text>
          </View>
        ))}
      </View>
      </View>
    </ScrollView>
  )
}


export default Details

const styles = StyleSheet.create({
  container: {
    paddingHorizontal: 18,
    backgroundColor: '#FFFFFF',
  },
  image: {
    width: 300,
    height: 450,
    resizeMode: 'contain',
  },
  rowContainer: {
    flexDirection: 'row',
  },
  name: {
    marginBottom: 4,

    fontSize: 20,
    fontWeight: '500',
  },
  ratingContainer: {
    marginVertical: 12,
  },
  priceContainer: {
    paddingVertical: 12,
    paddingHorizontal: 12,

    marginBottom: 12,

    borderRadius: 6,
    backgroundColor: '#deffeb',
  },
  rating: {
    marginRight: 4,

    borderRadius: 4,
    paddingHorizontal: 8,
    justifyContent: 'center',
    backgroundColor: '#008c00',
  },
  ratingText: {
    color: '#fff',
    fontSize: 14,
    fontWeight: '600',
  },
  ratingCount: {
    fontSize: 14,
    color: '#878787',
  },
  originalPrice: {
    fontSize: 18,
    fontWeight: '600',
    marginRight: 8,

    color: 'rgba(0, 0, 0, 0.5)',
    textDecorationLine: 'line-through',
  },
  discountPrice: {
    fontSize: 18,
    color: '#000000',
    fontWeight: '600',
  },
  offerPercentage: {
    fontSize: 17,
    fontWeight: '600',
    color: '#4bb550',

    marginRight: 8,
  },
  badge: {
    margin: 2,
    flexWrap: 'wrap',
    flexDirection: 'row',
  },
  tagBadge: {
    paddingVertical: 2,
    paddingHorizontal: 4,

    borderWidth: 1,
    borderRadius: 4,
    borderColor: 'rgba(0, 0, 0, 0.5)',

    color: 'rgba(0, 0, 0, 0.8)',
  },
});
Congratulations on Completing Your Guide: React Native Navigation for Beginners! 🎉🚀
Congratulations on completing this tutorial on "React Native Navigation: A Beginner's Guide! 🎉🚀" You've taken an important step towards mastering this powerful library. Remember, learning a new technology can be challenging, but with dedication and persistence, you can achieve great things. 💪💡
If you have any questions or get stuck while implementing React Native Navigation in your projects, don't hesitate to reach out to me. I'm more than happy to assist you. Feel free to contact me via Gmail at [parassingh1810@gmail.com]. I'm here to help you navigate through any obstacles and ensure your success. 📧🤝
Keep exploring and experimenting with React Native Navigation, as it opens up a world of possibilities for creating intuitive and seamless mobile experiences. Good luck on your journey, and I look forward to seeing your future achievements with React Native Navigation! 🌟🚀lities for creating intuitive and seamless mobile experiences. Good luck on your journey, and I look forward to seeing your future achievements with React Native Navigation! 🌟🚀
